> ## Documentation Index
> Fetch the complete documentation index at: https://docs.withflock.com/llms.txt
> Use this file to discover all available pages before exploring further.
# Display Placements
> Learn how to use checkpoints to dynamically trigger UI placements in your mobile and web applications.
## What are Placements?
A Placement is a UI component that can be embedded directly in your app. Think of it as a designated space where referral interfaces, rewards notifications, or promotional content can appear at strategic moments in the user journey.
Placements are:
* **Dynamic:** They can be shown or hidden based on user actions
* **Flexible:** They can be placed anywhere in your app's UI
* **Controlled:** Marketers can activate or deactivate them without code changes
## How Checkpoints Trigger Placements
Checkpoints and Placements work together to create a powerful, context-aware user experience:
1. **Checkpoints** mark specific moments in the user journey (e.g., completing a purchase, reaching a milestone)
2. **Placements** define the UI components appear in your app
3. **Campaigns** connect checkpoints to placements through the Flock dashboard
When a user hits a checkpoint in your app, the Flock system checks if the active campaign is configured to show a placement at that checkpoint. If there is, the appropriate UI component appears instantly.
By default, calling a checkpoint won't trigger any UI changes. You need to link checkpoints to placements through Flock Campaign builder.
***
## Implementation
### Step 1: Implement Checkpoints in Your App
First, add checkpoints at strategic moments in your user journey using the Flock SDK:
```swift iOS (Swift) theme={null}
// After user completes a key action (e.g., purchase)
Flock.shared.checkpoint(
name: "purchase_completed"
).trigger()
```
```kotlin Android (Kotlin) theme={null}
// After user completes a key action (e.g., purchase)
FlockSDK.checkpoint("purchase_completed")
.trigger(context)
```
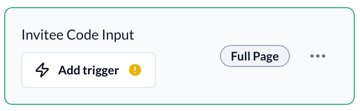
### Step 2: Link Checkpoints to Placements in the Campaign Builder
Once you've implemented checkpoints in your app, you can link them to placements through the Flock Campaign Builder:
 ### Step 3: Test Your Implementation
To ensure your checkpoints are correctly triggering placements:
1. **Use your Test environment:** Always make sure to use your Test environment to verify your setup.
2. **Trigger Checkpoints:** Perform the actions in your app that should trigger checkpoints.
3. **Verify Placements:** Confirm that the correct placements appear at the right moments.
***
## Advanced Configuration
### Handling Placement Navigation
When a placement is displayed, you can navigate to different screens within the same modal without closing and reopening it. This provides a seamless user experience, especially for multi-step flows like referral processes.
```swift iOS (Swift) theme={null}
Flock.shared.checkpoint("purchase_completed")
.onSuccess { flock in
// Navigate to a success screen within the current modal
flock.checkpoint("referral_succeeded").navigate().trigger()
}
.trigger()
```
```kotlin Android (Kotlin) theme={null}
FlockSDK.checkpoint("purchase_completed")
.onSuccess {
// Navigate to a success screen within the current modal
FlockSDK.checkpoint("referral_succeeded").navigate().trigger(context)
}
.trigger(context)
```
The `navigate()` method is key here - it tells the SDK to navigate within the existing web view instead of creating a new placement. This is particularly useful for:
* Showing success screens after a user completes an action
* Creating multi-step referral flows
* Displaying additional information without disrupting the user experience
When using `navigate()`, make sure the destination checkpoint is properly configured in your Flock campaign. The navigation will only work if the checkpoint exists and has content assigned to it.
## Troubleshooting
If placements aren't appearing when checkpoints are triggered:
1. **Check SDK Implementation:** Ensure you're correctly calling the checkpoint method
2. **Verify Campaign Configuration:** Confirm that the checkpoint is linked to a placement in an active campaign
3. **Test Mode:** Make sure you're testing in the correct environment (test vs. production)
4. **SDK Initialization:** Verify that the Flock SDK is properly initialized and the user is identified
5. **Console Logs:** Check your application logs for any SDK errors or warnings
For additional help, contact [support@withflock.com](mailto:support@withflock.com).
### Step 3: Test Your Implementation
To ensure your checkpoints are correctly triggering placements:
1. **Use your Test environment:** Always make sure to use your Test environment to verify your setup.
2. **Trigger Checkpoints:** Perform the actions in your app that should trigger checkpoints.
3. **Verify Placements:** Confirm that the correct placements appear at the right moments.
***
## Advanced Configuration
### Handling Placement Navigation
When a placement is displayed, you can navigate to different screens within the same modal without closing and reopening it. This provides a seamless user experience, especially for multi-step flows like referral processes.
```swift iOS (Swift) theme={null}
Flock.shared.checkpoint("purchase_completed")
.onSuccess { flock in
// Navigate to a success screen within the current modal
flock.checkpoint("referral_succeeded").navigate().trigger()
}
.trigger()
```
```kotlin Android (Kotlin) theme={null}
FlockSDK.checkpoint("purchase_completed")
.onSuccess {
// Navigate to a success screen within the current modal
FlockSDK.checkpoint("referral_succeeded").navigate().trigger(context)
}
.trigger(context)
```
The `navigate()` method is key here - it tells the SDK to navigate within the existing web view instead of creating a new placement. This is particularly useful for:
* Showing success screens after a user completes an action
* Creating multi-step referral flows
* Displaying additional information without disrupting the user experience
When using `navigate()`, make sure the destination checkpoint is properly configured in your Flock campaign. The navigation will only work if the checkpoint exists and has content assigned to it.
## Troubleshooting
If placements aren't appearing when checkpoints are triggered:
1. **Check SDK Implementation:** Ensure you're correctly calling the checkpoint method
2. **Verify Campaign Configuration:** Confirm that the checkpoint is linked to a placement in an active campaign
3. **Test Mode:** Make sure you're testing in the correct environment (test vs. production)
4. **SDK Initialization:** Verify that the Flock SDK is properly initialized and the user is identified
5. **Console Logs:** Check your application logs for any SDK errors or warnings
For additional help, contact [support@withflock.com](mailto:support@withflock.com).